using visual studio 2010 to create web application


Tài liệu LINQ to SharePoint DSL Extension for Visual Studio 2010 ppt
Ngày tải lên :
26/02/2014, 02:20
... content type to list relation
Content type to content type relation: to add a content type to content type relation
To add a tool in your schema, just drag and drop tool from the toolbox to the ... relational tools
List to list relation: to add a relation between two lists
List to content type relation: to add a list to content type relation
Content type to list relation: to add a ... VS toolbars, follow these steps:
1. On toolbar, click on the “More” button, click on “Add or Remove Buttons”, and “Customize”:
Picture: Customize the VS toolbars
2. Click on the “Toolbars”...
- 90
- 457
- 3

Moving to Microsoft® Visual Studio® 2010 doc
Ngày tải lên :
08/03/2014, 22:20
... class="bi x3 y73 w13 h26" alt=""
Bing Map services
SQL Server
Application
Cache
Application
Cache
Application
Cache
Application /
Web Tier
Data Tier
... int pageNumber)
{
using (var ctx = new PlanMyNightEntities())
{
ctx.ContextOptions.ProxyCreationEnabled = false;
// Stored Procedure with output parameter
var totalOutput = new ObjectParameter("total", ... Name="UserProfile" EntityType="Entities.Store.UserProfile"
store:Type="Views" store:Schema="dbo" store:Name="UserProfile">
<DefiningQuery>...
- 103
- 549
- 0


Tài liệu Accessing a Database Using Visual Studio .NET ppt
Ngày tải lên :
14/12/2013, 13:15
... from the
Customers table.
Figure 3.27: Viewing the rows in the Customers table using the Server Explorer
You can enter SQL statements by clicking the Show SQL Pane button in the toolbar, as ... you have VS
.NET, you should feel free to experiment with the Server Explorer-that's the best way to
learn.
Once you've connected to the database, you can view things such ... pop-up window. Figure 3.30
shows the
properties of the CustomerID column of the Customers table.
Figure 3.30: Properties of the CustomerID columns
You've only scratched the surface of...
- 3
- 447
- 0
Tài liệu Creating a Command Object Using Visual Studio .NET docx
Ngày tải lên :
21/01/2014, 07:20
...
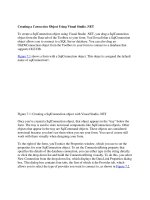
Creating a Command Object Using Visual Studio .NET
To create a SqlCommand object using Visual Studio .NET (VS .NET), you drag a
SqlCommand object from the Data tab of the Toolbox to your form. You ... Builder to create a SQL statement by clicking on the ellipsis button to
the right of the CommandText property, and you can set parameters for a command by
clicking the ellipsis button to the ... Windows application.
2. Add a SqlConnection object to your project (refer back to the previous chapter
to
see how to add a SqlConnection object using VS .NET). This object will have the
default...
- 3
- 378
- 0
Tài liệu Creating a Connection Object Using Visual Studio .NET pdf
Ngày tải lên :
21/01/2014, 07:20
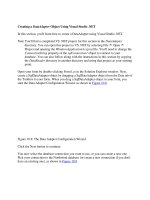
... a Connection Object Using Visual Studio .NET
To create a SqlConnection object using Visual Studio .NET, you drag a SqlConnection
object from the Data tab of the Toolbox to your form. You'll ... a SqlConnection
object allows you to connect to a SQL Server database. You can also drag an
OleDbConnection object from the Toolbox to your form to connect to a database that
supports OLE DB. ... SqlConnection object with Visual Studio .NET
Once you've created a SqlConnection object, that object appears in the "tray" below the
form. The tray is used to store nonvisual components...
- 7
- 380
- 0
Tài liệu Creating a DataAdapter Object Using Visual Studio .NET doc
Ngày tải lên :
21/01/2014, 07:20
...
Creating a DataAdapter Object Using Visual Studio .NET
In this section, you'll learn how to create a DataAdapter using Visual Studio .NET.
N
ote You'll find a completed ... sqlConnection1 object to connect to your
database. You can also follow along with the instructions in this section by copying
the DataReader directory to another directory and using that project ...
Click the Next button to continue.
You now select the database connection you want to use, or you can create a new one.
Pick your connection to the Northwind database (or create a new connection...
- 4
- 343
- 0

Tài liệu Creating a DataSet Object Using Visual Studio .NET docx
Ngày tải lên :
21/01/2014, 07:20
... running form
Creating a DataSet Object Using Visual Studio .NET
In this section, you'll learn how to create a DataSet using Visual Studio .NET.
N
ote You'll find a completed ... window. To create a DataSet object, you can perform either one of
the following:
ã Drag a DataSet object from the Data tab of the Toolbox to your form, and add
code to your form to fill it using ...
Figure 10.14: The Generate Dataset dialog box
Click the OK button to continue. The new DataSet object named dataSet11 is added to
the tray beneath your form, as shown in Figure 10.15
.
...
- 3
- 350
- 0

Tài liệu Creating a DataView Using Visual Studio .NET pptx
Ngày tải lên :
21/01/2014, 07:20
...
Creating a DataView Using Visual Studio .NET
In this section, you'll learn how to create a DataView using Visual Studio .NET (VS
.NET). You can follow along with ... tab of the Toolbox to your form. This
creates a DataView object named dataView1.
6. Set the Table property of your dataView1 object to dataSet11.Customers using the
drop-down list to the right ... Open VS .NET and create a new Windows application named myDataView.
2. Display Server Explorer, connect to your Northwind database, and drag the
Customers table to your form. This creates a SqlConnection...
- 3
- 331
- 0

programming in c# with visual studio 2010 vol i (microsoft)
Ngày tải lên :
24/01/2014, 19:37
...
\Visual Studio 2010\ MyProject\ folder.
1. Click Start, point to All Programs, click Microsoft Visual Studio 2010, click
Visual Studio Tools, and then click Visual Studio Command Prompt
(2010) . ... Framework 1-17
ã Explain how to create a console application by using the Console Application
template in Visual Studio 2010.
ã Use Visual Studio to compile and run an application.
1-30 Programming ... that are found in most Visual Studio solutions.
1-20 Programming in C# with Microsoftđ .Visual Studio 2010
Templates in Visual Studio 2010
Key Points
Visual Studio 2010 supports the development...
- 628
- 3.5K
- 0

programming in c# with visual studio 2010 vol II (microsoft)
Ngày tải lên :
24/01/2014, 19:43
... Writing a C# Application 1-33
Lesson 4: Building a Graphical Application 1-44
Lesson 5: Documenting an Application 1-58
Lesson 6: Debugging Applications by Using Visual Studio 2010 1-66
Lab: ... Programming in C# with Microsoftđ Visual Studio 2010
Automatic Properties
Key Points
When you develop a new type, you may include a data field that you want to
expose to applications. If no additional ... Microsoftđ Visual Studio 2010 v
Contents
Module 1: Introducing C# and the .NET Framework
Lesson 1: Introduction to the .NET Framework 4 1-4
Lesson 2: Creating Projects Within Visual Studio 2010...
- 884
- 7.7K
- 0

Tài liệu Defining a Relationship Using Visual Studio .NET doc
Ngày tải lên :
26/01/2014, 07:20
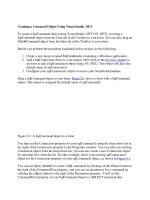
... the Schema Editor, as shown in Figure 12.6
.
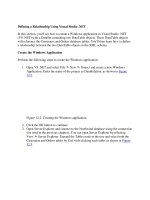
Defining a Relationship Using Visual Studio .NET
In this section, you'll see how to create a Windows application in Visual Studio .NET
(VS ...
the OK button to continue.
This adds the new relation to the Customers and Orders entities in the XML schema. You
can click the diamond between the Customers and Orders entities to view the ...
12.2.
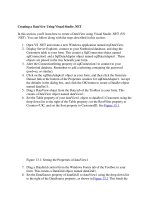
Figure 12.2: Creating the Windows application
2. Click the OK button to continue.
3. Open Server Explorer and connect to the Northwind database using the connection
you used in the previous...
- 5
- 384
- 0