if two routes to the same network tie with th

49 so do mach dien oto 2001 manual 3 sedan
Ngày tải lên :
25/12/2013, 09:11
... locked only The antitheft alarm system is not activated To engage the locks > Either unlock the doors together with the button for the central locking system and then pull each of the release ... inform you that the vehicle has been properly locked.< > To open: with the door closed, turn the key to the "Unlock" position and hold it > To close: with the door closed, turn the key to the "Lock" ... the head restraint upward to the stop > Press the button (arrow) and remove the head restraint In order to move to the lowest positions, press button 1.< Installation To adjust the angle of the...
- 211
- 551
- 0

52 so do mach dien oto 215651 shop manual xe o to MERCEDES SPRINTER
Ngày tải lên :
25/12/2013, 09:11
... adjustment and to prevent unnecessary load on the locking device OR IGI NAL Bring the sliding door manually to almost closed position and then slowly pull inward the door till the first "click" ... heard ll pu Connect the (yellow/black wire) to the electric motor plug as seen in the picture take out from wire set (–) yellow(+ In case the second “click” is not heard turn the screw one turn ... turn counterclockwise and secure with the nut ck bla yellow black After finish the adjustment connect the black wire to yellow plug(+) and yellow wire to ground for two seconds 08.08 ELECTRIC SLIDING...
- 19
- 1.5K
- 4

53 so do mach dien oto 215653 REPAIR MANUAL xe o to volkswagen passat
Ngày tải lên :
25/12/2013, 09:11
... disassembling Inner sealing ring for toothed rod, pulling out Checking toothed rod for scoring Sealing ring on toothed rod, replacing Sealing rings, installing on toothed rod piston Power steering gear, ... assembling Inner sealing ring for toothed rod, installing Toothed rod, installing in housing Adhesive tape, applying Power steering gear, adjusting with new toothed rod Assembly overview: power ... nut in the side member are damaged, the thread must either be retapped or the cap nut must be drilled out When drilling out proceed as follows - Support engine/transmission assembly with 10222...
- 369
- 663
- 1

58 so do mach dien oto 216094 xe o to ford sierra phan service and re
Ngày tải lên :
25/12/2013, 09:12
... 50 to 70 73 to 83 95 to 115 30 to 41 37 to 52 54 to 61 70 to 85 35 to 40 26 to 30 70 to 75 52 to 55 Tighten through a further 90º to to to to 13 to 17 to 1.5 to to to 10 to 13 17 to 21 20 to ... 64 to 70 17 to 21 to 13 41 to 44 74 to 85 33 to 37 33 to 37 47 to 52 13 to 15 to 10 to to 8 to 10 21 to 28 12 to 15 0.7 to 1.5 to 6 to 15 to 21 to 11 45 to 50 50 to 55 33 to 37 37 to 41 40 to ... jack until the wheel is clear of the ground, then remove the wheel nuts and the wheel Fit the spare wheel and secure it with the wheel nuts Lower the jack until the wheel is just touching the ground,...
- 340
- 864
- 0


61 so do mach dien oto renault 19 service manualMR293R190
Ngày tải lên :
25/12/2013, 09:12
... FROM THE FRONT LIFTING WITH THE TROLLEY JACK FROM THE REAR Apply the handbrake or place chocks under the rear wheels It is FORBIDDEN to lift the rear of the vehicle taking the load under the rear ... forbidden to lift the vehicle by taking the load under the front suspension arms Use whichever of the sockets Cha 408-02 that suits the trolley jack to fit pad Cha 280-02 LIFTING WITH THE TROLLEY ... (A) with no dipstick Plug (A) with dipstick 92081R DI0522 Fill to the level of the opening Wipe the dipstick section Refit the plug without tightening it, dipstick downwards Remove the plug, the...
- 51
- 402
- 0

Sơ đồ mạch điện xe ô tô Ford - Taurus 1997.pdf
Ngày tải lên :
23/08/2012, 11:28
...
1997 System Wiring Diagrams Ford - Taurus PAVLIN Sunday, November 27, 2005 08:07PM Fig 4: Anti-theft Circuit 1997 Ford Taurus LX Page Copyright © 2002 MRIC, LLC
1997 System Wiring Diagrams Ford ... Fig 38: Autolamps Circuit, W/ DRL 1997 Ford Taurus LX Page 38 Copyright © 2002 MRIC, LLC
1997 System Wiring Diagrams Ford - Taurus PAVLIN Sunday, November 27, 2005 08:07PM Fig 39: Autolamps Circuit,...
- 76
- 6.6K
- 23

Sơ đồ mạch điện xe ô tô Ford Explorer 1996.pdf
Ngày tải lên :
23/08/2012, 11:28
... 2004 09:51AM SYSTEM WIRING DIAGRAMS Anti-theft Circuit (p 4) 1996 Ford Explorer For x Copyright © 1998 Mitchell Repair Information Company, LLC Monday, October 04, 2004 09:51AM SYSTEM WIRING DIAGRAMS ... Monday, October 04, 2004 09:52AM SYSTEM WIRING DIAGRAMS Headlamps Circuit, W/ Autolamps (p 28) 1996 Ford Explorer For x Copyright © 1998 Mitchell Repair Information Company, LLC Monday, October 04, ... Monday, October 04, 2004 09:51AM SYSTEM WIRING DIAGRAMS Body Computer Circuits (2 of 2) (p 6) 1996 Ford Explorer For x Copyright © 1998 Mitchell Repair Information Company, LLC Monday, October 04,...
- 67
- 2.7K
- 8

Tài liệu của Ford Fiesta - sơ đồ mạch điện Fies
Ngày tải lên :
20/10/2012, 09:58
... REFERENCE Thursday, August 2010 09:47:56 PART MUST COMPLY WITH RESTRICTED SUBSTANCE MANAGEMENT STANDARD WSS-M99P9999 A1 TO SAFEGUARD HEALTH SAFETY AND THE ENVIRONMENT DRAFTED IN ACCORDANCE WITH FORD ... REFERENCE Thursday, August 2010 09:47:56 PART MUST COMPLY WITH RESTRICTED SUBSTANCE MANAGEMENT STANDARD WSS-M99P9999 A1 TO SAFEGUARD HEALTH SAFETY AND THE ENVIRONMENT DRAFTED IN ACCORDANCE WITH FORD ... REFERENCE Thursday, August 2010 09:47:56 PART MUST COMPLY WITH RESTRICTED SUBSTANCE MANAGEMENT STANDARD WSS-M99P9999 A1 TO SAFEGUARD HEALTH SAFETY AND THE ENVIRONMENT DRAFTED IN ACCORDANCE WITH FORD...
- 66
- 1.8K
- 4

Bản vẽ sơ đồ mạch điện xe ô tô LEXUS LX 570 - P1
Ngày tải lên :
22/10/2012, 15:23
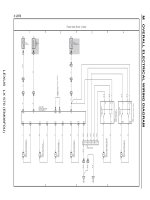
... E59 Junction Connector 77 1C 1B 75 EA1 B 11 B IG2D E1(A), E2(B) Main Body ECU 30A IG2 MAIN B SS1 IG2 Relay BR W–B 13 2 A34 Junction Connector BR 10A IGN E67 Junction Connector 1B 5A MET 10A INJ ... 1B G Free B IG1 NO Relay < 29–1> SS2 GND SS1 Full Traveling G SS2 EFI Relay D E59 Junction Connector E18 Engine Switch 25A EFI MAIN 10A HORN 15A A/F E R 5A EFI NO D R P IG1D A R C B LEXUS LX 570 ... 15A RR WIPER 20A RR DOOR LH W–B G 20A WSH 20A RR DOOR RH 30A WIPER 62 2D W–B E E62 Junction Connector W–B LEXUS LX 570 (EM08F0U) 30A RSF RH 15A TI&TE TAIL Relay 30A RSF LH E1 E3 M OVERALL ELECTRICAL...
- 3
- 3.9K
- 78

Bản vẽ sơ đồ mạch điện xe ô tô LEXUS LX 570 - P2
Ngày tải lên :
22/10/2012, 15:23
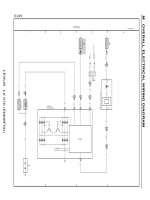
... Short Connector B K28(A), K29(B), K41(C) Junction Connector W–B L CANL B V B L 15 BR 19 A L P 14 20 A B 13 L E68 Junction Connector 12 A L A Y L W AE3 L L L 12 Y P 16 L E74 Junction Connector F21 ... Connector 14 L 2 SB 13 E71 Junction Connector L Y L L LEXUS LX 570 (EM08F0U) B CANH C CANL 10 FE4 A E11 Steering Sensor 20 C 10 A Y A V CANH E84(C) Steering Control ECU A24(A) Skid Control ECU with ... Assembly L33(A) No Multiplex Network Body ECU R CANN 15 C 12 15 13 R A A C C D D E E B B Y 73 EL1 E73 Junction Connector R LG R R FE7 FE7 MPX+ CANH E6 Option Connector (Bus Buffer) C D CANL 36...
- 4
- 2.4K
- 55

Bản vẽ sơ đồ mạch điện xe ô tô LEXUS LX 570 - P3
Ngày tải lên :
22/10/2012, 15:23
... Power Window Regulator Motor Assembly RH < 5–3> Rear Power Window Regulator Motor Assembly RH < 5–3> Rear Power Window Regulator Motor Assembly LH < 5–3> CSW BR G Multiplex Network Master Switch ... Connector A BR (BAT) 20 2B 25A DOOR NO MIRE B B E61 Junction Connector ALTB LIN2 10 C E94(A), E95(B) Outer Mirror Switch Assembly E59 Junction Connector W–B 20 13 W–B E62 Junction Connector W–B ... A u to m a tic L ig h t C o n tro l a n d L ig h t A u to T u rn O ff S y s te m 17 18 In te rio r L ig h t 19 20 E1(A), E2(B), E3(C), E4(D) Main Body ECU FSPT 11 C 34 E58 Junction Connector...
- 13
- 1.9K
- 14

Bản vẽ sơ đồ mạch điện xe ô tô LEXUS LX 570 - P4
Ngày tải lên :
22/10/2012, 15:23
... Switch E61 Junction Connector 45 E28 ID Code Box LIN1 W B 28 EA3 27 EA3 96 E66 Junction Connector W–B BR E67 Junction Connector 13 BR W–R R–G 13 76 W–B E67 Junction Connector BR +B BR EFII W–B EFIO ... z22 Front Door Electrical Key Oscillator RH z24 Front Door Electrical Key Oscillator LH R R I2 A B I1 M S m a rt A c c e s s S y s te m w ith P u s h – B u tto n S ta rt a n d T h e ft D e te rre ... E29(A), E30(B) Certification ECU Assembly M OVERALL ELECTRICAL WIRING DIAGRAM LX 570 (Cont' d) LX 570 (Cont' d) (Cont next page) S m a rt A c c e s s S y s te m w ith P u s h – B u tto n S ta rt a...
- 6
- 1.7K
- 41

Bản vẽ sơ đồ mạch điện xe ô tô LEXUS LX 570 - P5
Ngày tải lên :
22/10/2012, 15:23
... Regulator Motor Assembly RH G J4 Rear Power Window Regulator Motor Assembly RH L M 17 JL1 AUTO GND W–B 10 JL1 J3 Rear Power Window Regulator Switch Assembly RH A I3 Front Power Window Regulator ... 2D L L 33 2D E61 Junction Connector L G LEXUS LX 570 (EM08F0U) 18 G 11 IE2 28 G 39 EL1 58 EL1 4 IE2 GND LIN LIN LED AUTO 9 UP 10 DOWN AUTO 10 UP DOWN B R B W–B AUTO L G W–B LED W–B R B L G GND...
- 2
- 1.7K
- 33