hướng dẫn cài pro engineer wildfire 5 0


03 hướng dẫn cài đặt VMware vcenter 5 0
Ngày tải lên :
15/01/2014, 15:43
... bài viết này hướng dẫn chi tiết các bước cài đặt vCenter 5. 0
Chuẩn bị môi trường để cài đặt :
- Bạn có thể cài vCenter lên 1 Server vật lý hoặc 1 Server ảo, để cho thuận tiện bạn nên cài đặt vCenter ... Server 200 8 R2 để cài vCenter.
- Download bộ cài đặt vCenter 5. 0 từ webiste : www.vmware.com, chú ý là bạn có thể dùng thử 60 ngày (trial)
nếu chưa có License của vCenter.
Các bước cài đặt:
- ...
trong hướng dẫn này ta sử dụng SQL Server 200 8 Express đi kèm bộ cài đặt. Nhấn Next để tiếp tục.
Hướng dẫn cài đặt VMware vCenter 5. 0
Giới thiệu
Để quản trị tập trung các Hypervisor ESX/ESXi cũng...
- 8
- 793
- 1


CARD HOLDER - Pro/ENGINEER Wildfire 3.0
Ngày tải lên :
19/10/2013, 12:15
... over the appearance in the
palette.
1
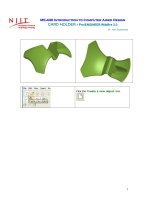
ME-4 30 Introduction to Computer Aided Design
CARD HOLDER -
Pro/ ENGINEER Wildfire 3 .0
Dr. Herli Surjanhata
Pick the Create a new ...
Click New Set for
round Set 2.
Enter
0 .5
mm radius
of round for Set 2
Pick the edge as
shown.
Click New Set for
round Set 3.
Enter
1 .0
mm
radius of round for
Set 3
Pick ...
35
Click
. Enter the shell thickness of 3 .0 mm.
Pick the all side faces
(THREE surfaces) and
bottom surface as shown.
Click
.
Create another shell with 0. 8...
- 44
- 455
- 5

ME-430 Introduction to Computer Aided Design ARM BRACKET - Pro/ENGINEER Wildfire 2.0
Ngày tải lên :
27/10/2013, 17:15
...
1
ME-4 30 Introduction to Computer Aided Design
ARM BRACKET -
Pro/ ENGINEER Wildfire 2 .0
Dr. Herli Surjanhata
In a system window, create a new directory called ME-4 30 (e.g.
H:\PTC_Working_Dir\ME-4 30) . ...
Horizontal: 10
Vertical: 12 .5
This placement references can be
verified by clicking the Placement
tab.
Click
.
6
Click
.
Type in 40 for ... the Extrude on both sides
icon
.
Enter the cut depth 25 mm.
Click
.
Click on
to define
sketch section for cut.
5
Click the Close button in the
References dialog...
- 18
- 525
- 0

Variable Pitch Helical Extension Spring Pro/ENGINEER Wildfire 2.0
Ngày tải lên :
06/11/2013, 00:15
...
Double click PITCH1 .00 , and change the value
0 .5.
Pick the Regenerate icon
.
Pick the
trajectory.
20
4
Sketch a circle with diameter 0. 25 centered
on the ...
The revolved angle
is 30 degrees.
RIGHT
datum
plane
1
ME-4 30 INTRODUCTION TO COMPUTER AIDED DESIGN
Variable Pitch Helical Extension Spring
Pro/ ENGINEER Wildfire 2 .0
Dr. Herli Surjanhata
... in Figure below.
5
Modify the Profile of the sweep and change the value of the pitch to [0 .5] . Then
Regenerate to see the effect.
Right-click the Protrusion from the Model...
- 20
- 392
- 1

Variable Pitch Conical Spring Pro/ENGINEER Wildfire 2.0
Ngày tải lên :
06/11/2013, 00:15
... revolved angle to be 1 80.
and click the
button to finish.
CREATE A REVOLVED PROTRUSION AT THE TOP PART OF SPRING
Repeat the same procedure as shown above for 1 80 revolved protrusion, here ... GRAPH
menu and OK from the dialog
box.
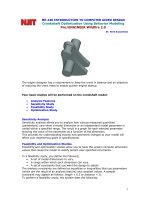
ME-4 30 INTRODUCTION TO COMPUTER AIDED DESIGN
Variable Pitch Conical Spring
Pro/ ENGINEER Wildfire 2 .0
Dr. Herli Surjanhata
START CREATING A NEW ... the dimensions.
When you are done with the section enter
[0. 75] as the pitch at the start and end of the
profile.
A PITCH GRAPH will appear in a sub-window.
Pick the three...
- 14
- 373
- 0
Tài liệu Crankshaft Optimization Using Behavior Modeling Pro/ENGINEER Wildfire 2.0 pptx
Ngày tải lên :
12/12/2013, 12:15
...
Add Dimension button
, and select
appropriate dimensions as shown
below – The HEIGHT distance 3 .00 0;
the overall WIDTH 4 .00 0 and bottom
RADIUS 8 .00 0 of balancing body.
The three dimensions ...
PNT_COG_282)
Then pick the axis (e.g. A_4 axis).
The Distance = 0. 3 50 236 is shown
under Results.
Click the Close button.
5
ANALYSIS FEATURES
Click the Insert an analysis feature ...
3
Step 1:
Create a 1. 25 in diameter cylinder using FRONT datum plane as sketching plane. The
extrusion depth is 0 .5 in. Note that the center of the cylinder is 1. 75 in. above TOP
datum plane....
- 27
- 382
- 0
Tài liệu SHAFT - Pro/ENGINEER Wildfire 2.0 docx
Ngày tải lên :
12/12/2013, 12:15
...
First chamfer:
45 X 0. 03
First chamfer:
45 X 0. 03
First chamfer:
45 X 0. 03
First chamfer:
45 X 0. 03
5
Click
to re-dimension as shown ...
Use the same technique to create a 45 x 0. 02 in. chamfer on the edges shown
below.
Second chamfer:
45 x 0. 02
Second chamfer:
45 x 0. 02
10
In the dashboard, click the
Remove ... centerline as axis of
revolution
.
Diametral
dimension
1
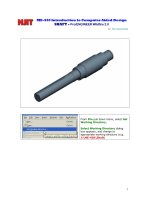
ME-4 30 Introduction to Computer Aided Design
SHAFT -
Pro/ ENGINEER Wildfire 2 .0
Dr. Herli Surjanhata
From File pull down...
- 25
- 355
- 0
Tài liệu TRAY - Pro/ENGINEER Wildfire 2.0 docx
Ngày tải lên :
12/12/2013, 12:15
... and then pick to complete the sweep.
1
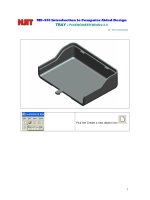
ME-4 30 Introduction to Computer Aided Design
TRAY -
Pro/ ENGINEER Wildfire 2 .0
Dr. Herli Surjanhata
Pick the Create a new ...
plane.
Click
.
Create a Sweep
Insert -> Sweep ->
Protrusion.
15
Pick the appropriate additional reference, and Close the Reference dialog box.
Sketch ...
Click
. Then Click .
Mirror the Tab
Select the tab (Extrude 5) feature from
the Model Tree. Pro/ ENGINEER
highlights all of the part geometry in the
graphics window.
From...
- 21
- 381
- 0

Tài liệu HƯỚNG DẪN CÀI ĐẶT DOTNETNUKE 4.5.3 pdf
Ngày tải lên :
13/12/2013, 10:15
... kèm theo)
Lựa chọn cơ sở dữ liệu:
- SQL Server 20 05 (Express) File
- SQL Server 200 0/ 20 05 Database
(Trong ví dụ này chúng ta chọn SQL Server 200 0/ 20 05 Database)
Nhấn vào nút “Test Database Connection” ... Security=True;User
Instance=True;AttachDBFilename=|DataDirectory|Database.mdf;"
providerName="System.Data.SqlClient" />
<! Connection String for SQL Server 200 0/ 20 05
<add
name="SiteSqlServer"
connectionString="Server=(local);Database=DotNetNuke;uid= ... Server 200 0/ 20 05 - kept for backwards
compatability - legacy modules
<add key="SiteSqlServer" value="Server=(local);Database=DotNetNuke;uid=
DotNetNukeUser;pwd=123 456 7;"/>
...
- 31
- 950
- 3


01 hướng dẫn cài đặt VMware ESXi 5 và cấu hình network, hostname
Ngày tải lên :
15/01/2014, 15:43
... sau
Chúc các bạn cài đặt thành công.
Bài tiếp theo sẽ là bài hướng dẫn cài đặt VMware vSphere Client 5. 0
- Quá trình cài đặt sẽ diễn ra trong vài phút. Màn hình báo hiệu kết thúc quá trình cài đặt hiện ... áp đặt thiết lập này.
ướng dẫn cài đặt VMware ESXi 5 và cấu hình Network, Hostname
Hướng dẫn cài đặt VMware ESXi 5 và cấu hình Network, Hostname
Yêu cầu trước khi cài đặt:
• Hệ thống với bộ xử ... nhé)
http://downloads.vmware.com/d/details/esxi 50/ dHRAYnQldGViZHAlZA==
- Sau khi tải về file .ISO xong, thực hiện burn ra đĩa CD
Bước 2: Cài đặt VMware ESXi 5
- Thực hiện khởi động server và boot vào đĩa CD vừa được burn ra.
- Màn hình cài...
- 21
- 3.7K
- 6
Tài liệu Pro/ENGINEER Wildfire 3.0 Tips and Tricks - Involute Gears pptx
Ngày tải lên :
20/01/2014, 04:20
...
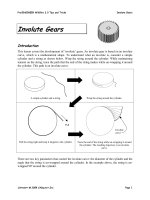
in Figures 5 and 6.
Figure 1 Figure 2 Figure 3
Figure 4
Figure 5
Involute
curve
Figure 6
Pro/ ENGINEER Wildfire 3 .0 Tips and Tricks Involute Gears
COPYRIGHT
200 8 CADQUEST INC. ... to create a datum
point as shown below
Pro/ ENGINEER Wildfire 3 .0 Tips and Tricks Involute Gears
COPYRIGHT
200 8 CADQUEST INC.
Page 5
Gear Parameters
The following are geometric ...
Base diameter
Root diameter
Fillet size
Pro/ ENGINEER Wildfire 3 .0 Tips and Tricks Involute Gears
COPYRIGHT
200 8 CADQUEST INC.
Page 9
Task 5: Create another datum point and a datum...
- 13
- 478
- 0

Tài liệu Hướng dẫn cài đặt Asianux Server 3.0 docx
Ngày tải lên :
24/01/2014, 03:20
... seconds
BootOrder: 00 01, 00 02, 00 03
Boot 000 1*Asianux
Boot 000 2*Asianux
Boot 000 3*Primary Master CDROM
Trong số đó, 00 01 trong Boot 000 1 là số, lựa chọn boot là Asianux.
2.1 .5. Boot Server IBM pSeries
Khởi ...
22
00 01 là số lựa chọn boot bị xoá. người quản trị có thể kiểm tra trực tiếp qua lệnh efibootmgr. Kết
quả ra như sau:
# efibootmgr
BootCurrent: 00 01
Timeout: 10 seconds
BootOrder: 00 01, 00 02, 00 03
Boot 000 1*Asianux
Boot 000 2*Asianux
Boot 000 3*Primary ... boot Asianux Server 3.
Nếu bạn chỉ cài đặt Asianux Server 3 trên hệ thống thì nên chọn MBR. Đối với
hệ thống đã cài hệ điều hành Windows 9X/ 200 0/NT thì nên cài bootloader cho
MBR.
Giao diện...
- 34
- 770
- 3

Tài liệu Hướng dẫn cài đặt ORCAD 10.5 ppt
Ngày tải lên :
25/01/2014, 08:20
... 4 trong thư mục cài đặt
thường mặc định là (C:\OrCAD\OrCAD_ 10 .5\ IntelliCAD 4). Tiếp theo ta
xóa file cadopia.dat trong thư mục cài đặt IntelliCAD 4 và đổi tên file
orcad_v1 05 . dat thành cadopia.dat. ... tất
+ sau đó ok tiếp để nó hỏi là có cài intelliCAD không? bạn phải chọn là
"yes"!
+ Tiếp đến nó đòi đĩa CD2 thì chọn đường dẫn đến CD2 (Nếu ko cài full nó
cũng ko cần)
+ Cứ next và ... Gặp next và ok thì cứ nhấn cho nó cài đặt để đến các bước tiếp theo
+ khi gặp cửa sổ yêu cầu chọn các thành phần của orcad,bạn hãy chọn bộ
hay dung hay có thể cài tất cũng được (tổng dung lượng...
- 2
- 1.8K
- 7

Tài liệu Pro/Engineer Wildfire 2.0 potx
Ngày tải lên :
23/02/2014, 08:20
... class="bi x0 y0 w3 h1" alt=""
- 83
- 384
- 1

- hướng dẫn cài pro engineer
- hướng dẫn cài pro engineer 2001
- hướng dẫn cài pro engineer wildfire 4 0
- hướng dẫn cài pro engineer wildfire 3 0
- hướng dẫn cài pro engineer 5 0
- hướng dẫn cài pro engineer 4 0
- hướng dẫn cài pro engineer 3 0
- hướng dẫn sử dụng pro engineer wildfire 5 0
- giao trinh pro engineer wildfire 5 0
Tìm thêm:
- hệ việt nam nhật bản và sức hấp dẫn của tiếng nhật tại việt nam
- xác định các mục tiêu của chương trình
- xác định các nguyên tắc biên soạn
- khảo sát các chuẩn giảng dạy tiếng nhật từ góc độ lí thuyết và thực tiễn
- khảo sát chương trình đào tạo của các đơn vị đào tạo tại nhật bản
- khảo sát chương trình đào tạo gắn với các giáo trình cụ thể
- xác định thời lượng học về mặt lí thuyết và thực tế
- tiến hành xây dựng chương trình đào tạo dành cho đối tượng không chuyên ngữ tại việt nam
- điều tra đối với đối tượng giảng viên và đối tượng quản lí
- điều tra với đối tượng sinh viên học tiếng nhật không chuyên ngữ1
- khảo sát thực tế giảng dạy tiếng nhật không chuyên ngữ tại việt nam
- khảo sát các chương trình đào tạo theo những bộ giáo trình tiêu biểu
- nội dung cụ thể cho từng kĩ năng ở từng cấp độ
- xác định mức độ đáp ứng về văn hoá và chuyên môn trong ct
- phát huy những thành tựu công nghệ mới nhất được áp dụng vào công tác dạy và học ngoại ngữ
- mở máy động cơ lồng sóc
- mở máy động cơ rôto dây quấn
- các đặc tính của động cơ điện không đồng bộ
- hệ số công suất cosp fi p2
- đặc tuyến hiệu suất h fi p2