advanced 2d and 3d

Tài liệu Introduction to AutoCAD 2009 2D and 3D Design- P1 pdf
Ngày tải lên :
24/12/2013, 17:15
... 247
Chapter 14 The modi cation of 3D models 249
Creating 3D model libraries 250
Constructing a 3D model 252
The 3D Array tool 254
The Mirror 3D tool 257
The 3D Rotate tool 258
The Slice tool ... 207
Chapter 12 Introducing 3D modelling 209
Introduction 210
The 3D Modeling workspace 210
Methods of calling tools for 3D modeling 211
The Polysolid tool 213
2D outlines suitable for 3D models 214
The ... whether a 3D Modeling , Classic AutoCAD or a 2D Drafting &
Annotation workspace has been set as the QNEW (see p. 276 ) . In this
example the 2D Drafting & Annotation workspace is shown and...
- 50
- 612
- 4

Tài liệu Introduction to AutoCAD 2009 2D and 3D Design- P2 pptx
Ngày tải lên :
24/12/2013, 17:15
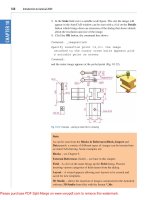
... Line and Arc tools. Then change all
widths of lines and arcs to a width of 2 with
Polyline Edit .
11. Construct the two outlines shown in Fig. 3.55
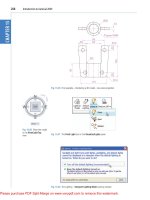
using the Rectangle and Line tools and ... bottom-right-hand
corner of the AutoCAD 2009 window, produces an uncluttered workspace
area. The command palette can be cleared from screen by entering
commandlinehide at the command line. To ... Polyline tool. The command line shows:
Command:
enter
pe
PEDIT Select polyline or [Multiple]: m (Multiple)
Select objects:
pick
any one of the lines or arcs
of the left-hand outlines of Fig...
- 50
- 624
- 1


Tài liệu 2D Artwork and 3D Modeling for Game Artists- P1 pptx
Ngày tải lên :
14/12/2013, 20:15
... walls, floors, and other 3D objects
that give them the illusion of realism and a graphics tablet makes hand-painting
them much easier, since it’s much more like working with pen and paper.
Also, ... digital gaming art world encompasses a few primary cate-
gories: 2D texture and background creation, 3D modeling and animation, and
level design. We’ll be diving deep into the first two, then ... smoke, stream, and wire are registered trademarks, and Discreet, 3ds max, backdraft,
combustion, jobnet, and sparks are trademarks of Autodesk Inc./Discreet Logic Inc. in the USA
and/ or other countries....
- 50
- 705
- 0

Tài liệu 2D Artwork and 3D Modeling for Game Artists- P2 docx
Ngày tải lên :
14/12/2013, 20:15
... the model’s dimensions and poly count, and build reference plane.
2. Build the muzzle.
3. Build the barrel.
4. Build the grip.
5. Build the hoops and hose.
6. Optimize and triangulate.
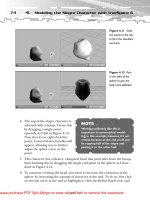
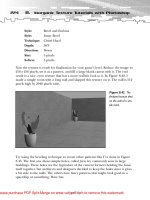
7. Export ... above the grip and trigger? That’s the
removable pellet clip, holding up to 100 rounds of static energy pulse modules
that, when activated by the trigger, bolt forward and begin expanding along ... quick preview, Figures 4.2 and 4.3 show the slogre sketches that you’ll
be working from to create the slogre character, as devised by me and my sketch-
artist friend and colleague, Lars Ricaldi....
- 50
- 551
- 0
Tài liệu 2D Artwork and 3D Modeling for Game Artists- P3 doc
Ngày tải lên :
14/12/2013, 20:15
... model in 3D space and select coordinates for
unwrapping. Notice that the Mapping tab under the Command Panel has
expanded to offer you a suite of options for unwrapping your object.
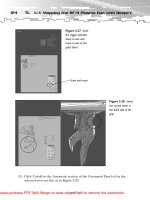
Click and drag ... open faces, and the
like, and fix them on-the-fly.
Figure 5.13
Importing the
RF9.stl file in 3D
Studio Max.
TIP
If you’re new to 3D Studio
Max, or need some guidance
using it, see the 3D Studio
Max ... way
to handle this one is to create only half of it since this beast is basically symmetrical.
If you were to union the legs and arms to both sides of the object and then opti-
mize it in 3D Studio...
- 50
- 462
- 0
Tài liệu 2D Artwork and 3D Modeling for Game Artists- P4 doc
Ngày tải lên :
14/12/2013, 20:15
... Faces option, and create another rectangular selection
around the hand. Do this in the 3D view, and not in the Material view. That
way, you’ll get all the points on the back of the hand and not on ... Max and
the slogre model open during this entire procedure).
15. When the update is complete, switch to 3D Studio Max and expand the
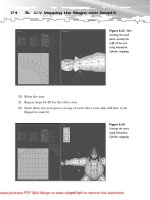
Editable Mesh item in the Modifier stack. Select Edge and, ... wrongfully selected in the thumb and arm (see
Figure 6.29), and cut the selection away.
9. Once the back side of the hand is cut
away, move it next to the other side
of the hand so you can work on both
(see...
- 50
- 436
- 0
Tài liệu 2D Artwork and 3D Modeling for Game Artists- P5 pdf
Ngày tải lên :
14/12/2013, 20:15
...
with Photoshop
11 Skinning the RF-9 Plasma Gun
with Deep Paint 3D and Photoshop
12 Skinning the Slogre with
Deep Paint 3D and Photoshop
TEAMFLY
... create.
Animal and reptile skins are usually easy to make by hand because they take the
same path as rock-texture creation—usually you can achieve a great base texture
for them using only a handful of ... create a seamless pattern,
and then combining that with patterns you’ve made by hand. In this example,
you’ll isolate the repetitious pattern in a digital photograph, and then fill a blank
canvas...
- 50
- 703
- 1
Tài liệu 2D Artwork and 3D Modeling for Game Artists- P6 docx
Ngày tải lên :
14/12/2013, 20:15
... Edit,
Preferences, Units and Rulers, and change both Rulers and Type to Pixels. Then,
under Edit, Preferences, Guides and Grid, change Gridlines to every 21 pixels, and
Subdivisions to 1. I had ... valleys.
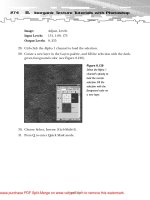
Click Image, Adjust, Levels (Ctrl+L), and slide the Midtones and Highlights
markers over to the left a little. This will enhance and sharpen the white
areas and subsequently will make the resulting ... you’ll understand when we’re finished.
1. With the sandstone texture you just created (which should include the Alpha
displacement channel), click Image, Image Size, and change the Width and
Height...
- 50
- 585
- 0
Tài liệu 2D Artwork and 3D Modeling for Game Artists- P7 ppt
Ngày tải lên :
24/12/2013, 06:16
... channel’s
selection and apply
the Gaussian Blur fil-
ter again. Copy and
paste this selection
into the Layers
palette.
Figure 8.185
Desaturate the layer,
and adjust the levels
and curves. Add a
drop shadow and ... textures
can be hand-made, taken from photograph, and more often than not, a composite
of both. What I find most striking about texturing metal is how sharp and effective
beveling styles and displacement ... Dodge and Burn tools to add more realism to the edges and whatnot.
In Figure 8.175, I also added some inset hex screws to the corners, and some sus-
tained shell damage.
Pipes, Wires, Rivets,
and...
- 50
- 371
- 0
Tài liệu 2D Artwork and 3D Modeling for Game Artists- P8 doc
Ngày tải lên :
24/12/2013, 06:16
... edge
looks three-dimensional and chopped up (see Figure 8.202).
329
. . . And the Rest
Figure 8.202
Apply a drop shadow
to the top boards,
and cut up the edge
to complete the 3D
effect.
Figure 8.201 ... wood.
21. Rasterize the type and cut out a selection where the gap between the boards
exists (see Figure 8.205).
331
. . . And the Rest
Figure 8.204
Add rivets to the
binder, and copy the
binder to ... shadows and other adjustments later.
25. Let’s add a drop handle to the top-center of the door. You can do this in
several ways—some people like to use the Path tool to create designs and
then...
- 50
- 397
- 0
- deverloping 2d and 3d
- vẽ đồ thị 2d và 3d
- advanced tips and tricks
- vẽ sketch 2d và 3d
- không gian 2d và 3d
- advanced grammar and vocabulary key
- oracle data integrator 11g advanced integration and development
- advanced tips and tricks for any rotary evaporator
- advanced 2d to 3d conversion
Tìm thêm:
- hệ việt nam nhật bản và sức hấp dẫn của tiếng nhật tại việt nam
- xác định các mục tiêu của chương trình
- xác định các nguyên tắc biên soạn
- khảo sát các chuẩn giảng dạy tiếng nhật từ góc độ lí thuyết và thực tiễn
- khảo sát chương trình đào tạo của các đơn vị đào tạo tại nhật bản
- khảo sát chương trình đào tạo gắn với các giáo trình cụ thể
- xác định thời lượng học về mặt lí thuyết và thực tế
- tiến hành xây dựng chương trình đào tạo dành cho đối tượng không chuyên ngữ tại việt nam
- điều tra đối với đối tượng giảng viên và đối tượng quản lí
- điều tra với đối tượng sinh viên học tiếng nhật không chuyên ngữ1
- khảo sát thực tế giảng dạy tiếng nhật không chuyên ngữ tại việt nam
- khảo sát các chương trình đào tạo theo những bộ giáo trình tiêu biểu
- nội dung cụ thể cho từng kĩ năng ở từng cấp độ
- xác định mức độ đáp ứng về văn hoá và chuyên môn trong ct
- phát huy những thành tựu công nghệ mới nhất được áp dụng vào công tác dạy và học ngoại ngữ
- mở máy động cơ lồng sóc
- mở máy động cơ rôto dây quấn
- các đặc tính của động cơ điện không đồng bộ
- hệ số công suất cosp fi p2
- đặc tuyến hiệu suất h fi p2