Adobe Photoshop CS2 Photographers’ Guide phần 2 ppt

Adobe Photoshop CS2 Photographers’ Guide phần 2 ppt
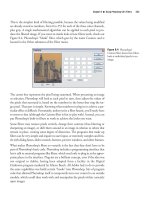
... boundaries. Check out Figure 2. 13 for the results. I’ve
inserted some Guides so you can see how the sides of the tower
now line up.
Adobe Photoshop CS2: Photographers’ Guide2 4
Figure 2. 10 Drag a selection
around ... like the one shown in Figure 2. 37.
Adobe Photoshop CS2: Photographers’ Guide4 2
Figure 2. 37 Adjusting the saturation and hue of the image
provides a bit...

Adobe Photoshop CS2 Photographers’ Guide phần 4 ppt
... when you’re satisfied, pro-
ducing the final image shown in Figure 4 .22 .
Adobe Photoshop CS2: Photographers’ Guide1 30
Figure 4 .21 After pasting the boy into his own layer, erase the
area around ... art and
part craft. Photoshop gives all of us a fighting chance to do some decent retouch-
ing, as you’ll learn in the next chapter.
Adobe Photoshop CS2: Photographers’ Guide1...
Adobe Photoshop CS2 Photographers’ Guide phần 8 ppt
... Wave and ZigZag filters at
work.
Adobe Photoshop CS2: Photographers’ Guide2 86
Figure 8.35 Wave (left) and ZigZag (right).
Adobe Photoshop CS2: Photographers’ Guide2 64
Figure 8.13 Light bouncing
from ... the efforts of an artist with one of these plug-ins.
Adobe Photoshop CS2: Photographers’ Guide2 72
Modifying Images with Photoshop s Filters
Photoshop s own filter...

Adobe Photoshop CS2 Photographers’ Guide phần 1 potx
... also can be used with my
digital SLR.
Adobe Photoshop CS2: Photographers’ Guide1 6
Yet, even as Photoshop grows in features and power, the best news is that Adobe
has avoided the trap Microsoft ... serious photographer and more than a casual Photoshop
user, you’re ready to shift into overdrive with this book.
Adobe Photoshop CS2: Photographers’ Guide2
industries, as wel...

Adobe Photoshop CS2 Photographers’ Guide phần 3 ppsx
... image is not the best looking one.
Adobe Photoshop CS2: Photographers’ Guide8 8
Figure 3 .22 Here are six
versions of the same image
with the contrast set at 25 %,
35%, and 50% (top row), and
65%, ... continuous series of focal
Adobe Photoshop CS2: Photographers’ Guide5 8
Figure 2. 57 Shot under
incandescent illumination, this
photo has been (partially)
corrected using Phot...

Adobe Photoshop CS2 Photographers’ Guide phần 5 pps
... is
formed. You can continue in this way, building a gen-
tly curved line.
Adobe Photoshop CS2: Photographers’ Guide1 52
Figure 5. 12 Drawing curves with the Pen tool.
PREVIEW
Before you add an anchor ... you’ve added.
7. Flatten the image, which should look like Figure 5 .27 .
Adobe Photoshop CS2: Photographers’ Guide1 64
Figure 5 .27 Flattened and cleaned up, the finished p...

Adobe Photoshop CS2 Photographers’ Guide phần 6 potx
... This example is
Adobe Photoshop CS2: Photographers’ Guide1 90
WHEN ARE 32 BITS ACTUALLY 24 BITS? AND WHEN IS 32 MORE
THAN 32?
In the past, when you used Photoshop with so-called 32- bit color images, ... effects you want. Figure 6 .21 shows an Irish land-
scape that has been made considerably greener using this dialog box.
Adobe Photoshop CS2: Photographers’ Guide2 06
Fi...

Adobe Photoshop CS2 Photographers’ Guide phần 7 potx
... the effect in Photoshop.
1. Start with a photo that has plenty of reds, greens, and blues, like the one
shown in Figure 7 .25 .
Adobe Photoshop CS2: Photographers’ Guide2 46
Figure 7 .25 This photo ... like Figure 7 .24 .
Adobe Photoshop CS2: Photographers’ Guide2 44
Figure 7 .24 A faded photo of an old Roman bridge was
salvaged by combining channels and applying a sepia ton...

Adobe Photoshop CS2 Photographers’ Guide phần 9 pps
... plug-in included with Photoshop CS and Photoshop Elements
3.0 that can manipulate the unprocessed images captured by digital cameras.
Adobe Photoshop CS2: Photographers’ Guide3 22
Figure A.5 Use the ... megapixels) 16 × 20 inches
3008 × 20 00 pixels (6 megapixels) 20 × 30 inches
3600 × 24 00 pixels (8 megapixels) 24 × 36 inches
Adobe Photoshop CS2: Photographers’ Gu...

Adobe Photoshop CS2 Photographers’ Guide phần 10 pps
... 20 0
histograms, 21 3 21 5
HLS/HSV, 20 5 20 6
matching color, 21 6 21 7
merging light, 22 0 22 3
mixed light source, 20 1
overexposure, 20 1 20 2
overview, 12, 20 2 20 3
photofinishing, 20 0 20 1
Adobe Photoshop CS2: Photographers’ ... source, 20 0
histograms, 21 3 21 5
HLS/HSV, 20 5 20 6
matching color, 21 6 21 7
merging light, 22 0 22 3
mixed light source, 20 1
overexp...
Từ khóa:
- hướng dẫn sử dụng phần mềm adobe photoshop cs2
- phần mềm adobe photoshop cs2
- adobe photoshop cs3 user guide pdf free download
- adobe photoshop cs2
- hướng dẫn sử dụng adobe photoshop cs2
- sách hướng dẫn học adobe photoshop cs2
- Báo cáo thực tập tại nhà thuốc tại Thành phố Hồ Chí Minh năm 2018
- Nghiên cứu sự biến đổi một số cytokin ở bệnh nhân xơ cứng bì hệ thống
- Báo cáo quy trình mua hàng CT CP Công Nghệ NPV
- chuyên đề điện xoay chiều theo dạng
- Nghiên cứu tổ hợp chất chỉ điểm sinh học vWF, VCAM 1, MCP 1, d dimer trong chẩn đoán và tiên lượng nhồi máu não cấp
- Giáo án Sinh học 11 bài 13: Thực hành phát hiện diệp lục và carôtenôit
- Giáo án Sinh học 11 bài 13: Thực hành phát hiện diệp lục và carôtenôit
- Giáo án Sinh học 11 bài 13: Thực hành phát hiện diệp lục và carôtenôit
- ĐỒ ÁN NGHIÊN CỨU CÔNG NGHỆ KẾT NỐI VÔ TUYẾN CỰ LY XA, CÔNG SUẤT THẤP LPWAN
- NGHIÊN CỨU CÔNG NGHỆ KẾT NỐI VÔ TUYẾN CỰ LY XA, CÔNG SUẤT THẤP LPWAN SLIDE
- Phối hợp giữa phòng văn hóa và thông tin với phòng giáo dục và đào tạo trong việc tuyên truyền, giáo dục, vận động xây dựng nông thôn mới huyện thanh thủy, tỉnh phú thọ
- Sở hữu ruộng đất và kinh tế nông nghiệp châu ôn (lạng sơn) nửa đầu thế kỷ XIX
- Tổ chức và hoạt động của Phòng Tư pháp từ thực tiễn tỉnh Phú Thọ (Luận văn thạc sĩ)
- Kiểm sát việc giải quyết tố giác, tin báo về tội phạm và kiến nghị khởi tố theo pháp luật tố tụng hình sự Việt Nam từ thực tiễn tỉnh Bình Định (Luận văn thạc sĩ)
- BT Tieng anh 6 UNIT 2
- Tăng trưởng tín dụng hộ sản xuất nông nghiệp tại Ngân hàng Nông nghiệp và Phát triển nông thôn Việt Nam chi nhánh tỉnh Bắc Giang (Luận văn thạc sĩ)
- Tranh tụng tại phiên tòa hình sự sơ thẩm theo pháp luật tố tụng hình sự Việt Nam từ thực tiễn xét xử của các Tòa án quân sự Quân khu (Luận văn thạc sĩ)
- Giáo án Sinh học 11 bài 15: Tiêu hóa ở động vật
- chuong 1 tong quan quan tri rui ro
- Giáo án Sinh học 11 bài 14: Thực hành phát hiện hô hấp ở thực vật