he thong dien tren xe oto doi moi


Nghiên cứu hệ thống điện động cơ, lập phương pháp kiểm tra, bảo dưỡng hệ thống điện trên xe mitsubishi triton
Ngày tải lên :
07/01/2014, 10:52
... 8+&*X*R
Xoay bánh răng theo chiều kim
đồng hồ và kiểm tra xem có quay trơn
không, xoay ngược chiều kim đồng hồ và
kiểm tra xem có bị hãm cứng không. Nếu
cần phải thay ... ra như hình 2.38.
Kiểm tra khe hở từ bánh răng đến
phần vỏ cố định bên trong cùng của cơ cấu
bảo vệ bánh răng bằng thước lá.
Giá tr tiờu chun: 0.5 ữ 2.0 mm
Nu khe h bỏnh răng khởi động vượt ... đánh giá một chiếc xe hơi cao cấp.
Trải qua thời gian học tập tại trường, với những kiến thức đã được trang bị giúp
em có thêm nhiều tự tin và gắn bó hơn với ngành mình đang theo học. Sau 3 năm...
- 73
- 2.7K
- 8

Tài liệu Hê thống điện trên xe ssanyang docx
Ngày tải lên :
18/01/2014, 23:20
...
Hê thống điện trên xe ssanyang (ELECTRIC SYSTEM
SSANYANG)
...
- 4
- 701
- 6


Toyota RAV4 1994 2000 body electrical hệ thống điện thân xe trên xe RAV4 đời 1994 2000
Ngày tải lên :
24/05/2014, 16:24
... method)
HINT:
These operations should be done only when the head adjust-
ment of the headlight aim is necessary, for example in case the
headlight aim ”0” mark deviates from the acceptable range
when the headlight ... toward the negative (−) terminal end.
(f) The point where the voltmeter deflects from zero to sever-
al V is the place where the heat wire is broken.
HINT:
If the heat wire is not broken, the voltmeter ... the motor.
10. INSPECT WASHER MOTOR OPERATION
Connect the positive (+) lead from the battery to terminal 2 and
the negative (−) lead to terminal 1, check that the motor oper-
ates.
NOTICE:
These...
- 54
- 1K
- 0


Hệ thống điện thân xe và điều khiển tự động trên ô tô ppt
Ngày tải lên :
24/03/2014, 13:20
... sau xe, trước xe, bên hông xe, trên nắp cabin để
chỉ báo chiều rộng, chiều dài và chiều cao xe. Các đèn kích thước thường
dùng kính khuyếch tán màu đỏ có công suất mỗi bóng là 10W.
www .oto- hui.com
... (–)C5
www .oto- hui.com
PGS-TS Đỗ Văn Dũng
Hệ thống điện thân xe & điều khiền tự động trên ôtô
Trang 56
Hình 2.31: Sơ đồ hệ thống tín hiệu trên xe TOYOTA HIACE
www .oto- hui.com
...
www .oto- hui.com
PGS.TS Đỗ Văn Dũng
Hệ thống điện thân xe & điều khiền tự động trên Ôtô
Trang
72
Khi công tắt rửa kính bật ON, dòng điện chạy đến motor rửa kính: Accu +
motor rửa...
- 233
- 5.4K
- 227

Toyota camry 2006 2011 axle hệ thống cầu trên xe toyota camry đời 2006 2011
Ngày tải lên :
24/05/2014, 13:15
... table below to help find the cause of the problem.
Check each part. If necessary, replace these parts.
Symptom Suspected area See page
Wander
1. Wheel alignment (Front) SP-4
2. Wheel alignment ... Install the front disc brake caliper assembly to the
steering knuckle with the 2 bolts.
Torque: 107 N*m (1,090 kgf*cm, 79 ft.*lbf)
NOTICE:
Do not twist the brake hose when installing the
front ... Install the front disc brake caliper assembly with the
2 bolts to the steering knuckle.
Torque: 107 N*m (1,090 kgf*cm, 79 ft.*lbf)
NOTICE:
Do not twist the brake hose when installing the
front...
- 21
- 589
- 1

Toyota land cruiser 1998 2007 body electrical hệ thống điện thân xe land cruiser đời 1998 2007
Ngày tải lên :
24/05/2014, 15:21
... Element check mode
After the diagnosis start-up, the system enters the element check mode. Check that the all elements
light up.
HINT:
By pressing the ”TUNE UP” switch, the system enters the ”Service ... antenna)?
Is the contact of the antenna terminal on the glass
surface and the defogger terminal?
Is the continuity of the antenna cord OK?
Check the grounding of the antenna, antenna cord.
Does the condition ... enters the ”Service Check Mode”.
(c) Switch check mode
(1) Element check mode is started at the same time with the switch check mode.
(2) Check that there is a beep sound when any switch is pressed.
HINT:
By...
- 212
- 1.8K
- 1
Toyota land cruiser 1998 2007 steering hệ thống lái trên xe land cruiser đời 1998 2007
Ngày tải lên :
24/05/2014, 15:33
... RING
Install the ring with the inscribed mark facing outward.
HINT:
Align the hole of the cam ring with the hole of the front housing.
5. INSTALL VANE PUMP ROTOR
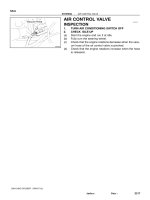
(a) Install the rotor with the inscribed ... CHECK IDLE-UP
(a) Start the engine and run it at idle.
(b) Fully turn the steering wheel.
(c) Check that the engine rotations decrease when the vacu-
um hose of the air control valve is pinched.
(d) ... that the stopper of the tube touches the PS vane
pump body as shown in the illustration, then torque the bolt.
3. CONNECT RETURN HOSE
Install the clip.
4. CONNECT 2 VACUUM HOSES
Install the 2...
- 66
- 824
- 0
toyota rav4 1994-2000 steering system - hệ thống lái trên xe toyota rav4 đời 1994-2000
Ngày tải lên :
24/05/2014, 16:30
... circumference catches on the
screw case.
(d) Pull the wheel pad out from the steering wheel and dis-
connect the airbag connector.
CAUTION:
S When storing the wheel pad, keep the upper surface
of the pad ... disassemble the wheel pad.
NOTICE:
When removing the wheel pad, take care not to pull the air-
bag wire harness.
2. REMOVE STEERING WHEEL
(a) Disconnect the connector.
(b) Remove the steering wheel set ... the engine at idle for a few minutes.
6. TURN STEERING WHEEL
(a) With the engine idling, turn the wheel to left or right full
lock and keep it there for 2−3 seconds, then turn the
wheel to the...
- 61
- 734
- 0
- hệ thống điện trên xe ô tô
- sơ đồ hệ thống điện trên xe ô tô
- kỹ thuật sửa chữa hệ thống điện trên xe ôtô
- hệ thống điện trên xe gắn máy
- hệ thống phanh tren xe oto
- hệ thống điện trên xe howo
- hệ thống điện trên xe hơi
- hệ thống điện trên xe honda wave và dream
- hệ thống điện trên xe máy
- hệ thống điện trên xe tay ga
- he thong lai tren xe oto
- kỹ thuật sửa chữa hệ thống điện trên xe ô tô
- he thong dien cua xe oto
- nghiên cứu chuẩn đoán sửa chữa hệ thống điện trên xe isuzu dòng xe bán tải dmax du lịch hilander trooper
- nghien cuu he thong dien tren xe may future neo
Tìm thêm:
- hệ việt nam nhật bản và sức hấp dẫn của tiếng nhật tại việt nam
- xác định các mục tiêu của chương trình
- xác định các nguyên tắc biên soạn
- khảo sát các chuẩn giảng dạy tiếng nhật từ góc độ lí thuyết và thực tiễn
- khảo sát chương trình đào tạo của các đơn vị đào tạo tại nhật bản
- khảo sát chương trình đào tạo gắn với các giáo trình cụ thể
- xác định thời lượng học về mặt lí thuyết và thực tế
- tiến hành xây dựng chương trình đào tạo dành cho đối tượng không chuyên ngữ tại việt nam
- điều tra đối với đối tượng giảng viên và đối tượng quản lí
- điều tra với đối tượng sinh viên học tiếng nhật không chuyên ngữ1
- khảo sát thực tế giảng dạy tiếng nhật không chuyên ngữ tại việt nam
- khảo sát các chương trình đào tạo theo những bộ giáo trình tiêu biểu
- nội dung cụ thể cho từng kĩ năng ở từng cấp độ
- xác định mức độ đáp ứng về văn hoá và chuyên môn trong ct
- phát huy những thành tựu công nghệ mới nhất được áp dụng vào công tác dạy và học ngoại ngữ
- mở máy động cơ lồng sóc
- mở máy động cơ rôto dây quấn
- các đặc tính của động cơ điện không đồng bộ
- hệ số công suất cosp fi p2
- đặc tuyến hiệu suất h fi p2