boulevard photography the art of automotive advertising

Tài liệu The Art Of Advertising docx
Ngày tải lên :
14/02/2014, 04:20
... with the message or proposition, feels “is part of
me and I am part of it.” He or she should use it or become part of the cause or use it to express part of who they
are. Second, the expression of ... of the economy.
Breakthrough Advertising A Mix of Science & Art
Ernest W. Bromley
Bromley Communications
Chairman & CEO
The Art of Advertising
Advertising is a mix of science and art. ... through the clutter, engage the consumers, and persuade them to take an action or
purchase the product. At the end of the process, you need to get the results and learn from them. Don’t be
disheartened...
- 78
- 558
- 0
Tài liệu The History and Practice of the Art of Photography docx
Ngày tải lên :
22/02/2014, 03:20
... before
directed, either to diffused day-light or to the direct rays of the sun. The light will now penetrate the white
parts, and the second photograph be the reverse of the first, or a true picture of the ... of the water from this bulb decreases the temperature of the mercury in the tube b in proportion to
the dryness of the atmosphere, and the number of degrees the tube b indicates below that of the ... the
ferro-citrate of the protoxide, or the peroxide of mercury, or of the protoxide of lead, by using creams of these
salts, or by successive applications of the nitrates of the respective oxides,...
- 56
- 631
- 2

Inside The Minds The Art Of Advertising doc
Ngày tải lên :
22/03/2014, 14:20
... with the message or proposition, feels “is part of
me and I am part of it.” He or she should use it or become part of the cause or use it to express part of who they
are. Second, the expression of ... basics.
Table of Contents
Inside the Minds The Art of Advertising Leading Advertising CEOs on
Generating Creative Campaigns & Building Successful Brands
Brandtailing Advertising at the Speed of Smart
Breakthrough ... basics.
Table of Contents
Inside the Minds The Art of Advertising Leading Advertising CEOs on
Generating Creative Campaigns & Building Successful Brands
Brandtailing Advertising at the Speed of Smart
Breakthrough...
- 78
- 392
- 0

adobe photoshop elements 3 solutions - the art of digital photography
Ngày tải lên :
04/06/2014, 11:33
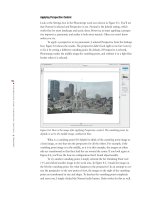
... see the extensive toolbar on the
left of the screen and the palette bin on the right. You can access Quick Fix by clicking
the Quick Fix icon found to the far right of the shortcuts bar, in the ... and do one of the following:
ã Click the Trash button at the top of the File Browser window.
ã Drag the files to the Trash button.
ã Press the Delete key.
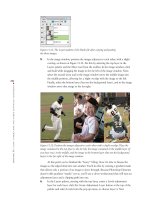
ã Choose File Delete from the File Browser ... found at the bottom right of the Organizer (again, see
Figure 1.11). Move the slider to the left and the thumbs are shrunk, to the right and
they are enlarged. Obviously, the larger the thumbnails...
- 366
- 411
- 0

Photoshop Elements 3 Solutions: The Art of Digital Photography- P2 ppt
Ngày tải lên :
02/07/2014, 02:20
... in the Editor, this icon appears on the thumbnail
of the image in the Organizer.
By the way, the Organizer saves copies of your work in predetermined locations.
You can change the location in the ... you change the size of
the thumbnail displays via View in the File Browser menu bar, but you can change the
size of the entire window by placing your cursor in the lower-right corner of the win-
dow ... dragging the window to the desired size. To change the size of
the tab items on the left side of the window (Folders, Preview, and Metadata), click the
top, right, or bottom border and drag to the...
- 30
- 329
- 0

Photoshop Elements 3 Solutions: The Art of Digital Photography- P3 ppsx
Ngày tải lên :
02/07/2014, 02:20
... Although the filter got rid of most of the smaller artifacts, the larger ones
remained. To get rid of these, I selected the Clone Stamp tool ( ) from the
toolbox. In the options bar, I selected the ... FACES
■
Enhancing the Color
It’s easy to enhance the color of the eyes. I use a method similar to the one I just
described, but instead of using the Dodge tool on the white areas of the eye, I use the
Sponge ... placed the brush over one of the eyes, and then clicked and held the mouse
without moving the cursor. The Bloat tool moved pixels away from the center
of the brush, effectively making the eye...
- 30
- 279
- 0

Photoshop Elements 3 Solutions: The Art of Digital Photography- P4 pdf
Ngày tải lên :
02/07/2014, 02:20
... percent of the sky this way
and stopped just above the top of the horse and the top of the rock talus. At
this point, I wasn’t very precise and some of the clone spilled over the horse and
the rock ... placed the cursor on the top far left of the image of the man and the horse and
“painted” the new sky. I started with a horizontal stroke, going from left to
right, filling in the top 33 percent of ... you click the
cursor on a color, that color appears in the upper half of the color rectangle to
the right of the color slider, with the sampled color appearing in the lower half
of the rectangle.
2....
- 30
- 346
- 0
Photoshop Elements 3 Solutions: The Art of Digital Photography- P6 pptx
Ngày tải lên :
02/07/2014, 02:20
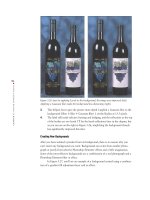
... +V) the selection onto
the second image. He used the Move tool ( ) from the toolbox to position the
label in place. (See Figure 5.40.)
3. Will then used the Eraser tool ( ) to erase parts of the ... edge of the image window
(Windows) or by Option+clicking in the box next to the percentage readout, at
the bottom left of the image window (Mac). You can also get the image size by
going to the ... Layers palette, I set the
Opacity to 50 percent so I could see part of the underlying image. I then used the
Move tool ( ) to position the selection into place. I used part of my friend Joe’s
shoulder...
- 30
- 260
- 0
Photoshop Elements 3 Solutions: The Art of Digital Photography- P7 pptx
Ngày tải lên :
02/07/2014, 02:20
... clicking on them, and then painting the sampled areas over the cones
(shown on the left in Figure 7.8). Then she sampled parts of the wall and the
sidewalk and painted them over the sandwich ... and then changed to Hard Round
5 pixels as I worked on the wire near the windowsill and the wire near the top
of the roof. I chose a hard-edged brush because I wanted to keep the texture of
the ... with the wires on the left side of the image and use the Clone Stamp
tool to remove them. If you choose to use the Healing Brush tool, the method is basi-
cally the same. However, with the Healing...
- 30
- 288
- 0
Photoshop Elements 3 Solutions: The Art of Digital Photography- P8 pot
Ngày tải lên :
02/07/2014, 02:20
... insertion bar in the
shape of an I-beam appeared at the point of clicking. I then typed in my letters.
The baseline of my type lined up with the small line through the bottom of the
I-beam. The I-beam ... I made the image on
the left the vanishing point. See what happens to the perspective? In an attempt to cor-
rect the perspective to the new point of view, the images to the right of the vanishing
point ... also offers control
over the amount of space between lines of type. This is called leading, and most
of the time the Auto setting in the pop-up menu is the way to go. Generally, the
higher the...
- 30
- 305
- 0

Photoshop Elements 3 Solutions: The Art of Digital Photography- P9 pps
Ngày tải lên :
02/07/2014, 02:20
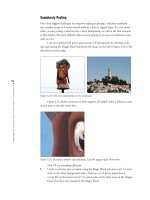
... include ICC color profiling.
With two views of your image, one showing the original image and the other
showing the effects of the compression, it’s easy to compare them and choose the opti-
mal setting. ... hence the smaller file size. The second
image (right) contains lots of high-frequency data in the form of thin strands of hair. It
takes a lot more work to compress this kind of data; therefore, the ... process, wait until the image has loaded (as indicated by the
status bar at the bottom of the work area) and then, when the image starts to be opti-
mized (again, as indicated by the status bar),...
- 30
- 340
- 0

Photoshop Elements 3 Solutions: The Art of Digital Photography- P10 pot
Ngày tải lên :
02/07/2014, 02:20
... blocked the effect of the Levels command on
the mountain and sky areas of the image.
7. For the most part, the mask created by the Gradient tool was enough. However,
I did go back into the adjustment ... histogram in the upper right
of the Camera Raw plug-in window. The highlight values are shifted to the right and
are clipped by the edge of the graph, indicating loss of highlight detail. The tonal ... zoomed-in shot of the edges shown in Figure 10.20 illustrates how Photoshop
Elements adds variations of the Matte color to the edges of the graphic. Now when the
graphic is placed against the browser...
- 30
- 321
- 0
Photoshop Elements 3 Solutions: The Art of Digital Photography- P11 doc
Ngày tải lên :
02/07/2014, 02:20
... release the mouse. Then Shift+drag from the right edge of the middle
image about
1
/
2
inch inward (to the left).
16. Turn off the visibility of the middle image if necessary to see the image on the
right. ... visibility of the top layer to see the leftmost
edge of the middle image; do this by clicking the eye icon next to the top layer.
15. On the left edge of the middle image, Shift+drag inward (to the ... the Web, start by selecting the
images you want in the gallery before clicking the Create icon. Otherwise, the applica-
tion will assume you want all the images from the catalog included in the...
- 30
- 244
- 0
Photoshop Elements 3 Solutions: The Art of Digital Photography- P12 pot
Ngày tải lên :
02/07/2014, 02:20
... palette bin by
grabbing the gripper at the bottom of the palette. You can also dock palettes together
on the work area by dragging one palette’s tab onto the body of the other palette (see
Figure ... the resolution is 72ppi.
This view takes into account the resolution of the image, as well as the
resolution of the monitor. Two images can have the same height and width
in pixels, but if the ... magnification of the image. Change the color of the view box
by selecting Palette Options from the More pop-up menu.
Hand Tool
The Hand tool ( ), located in the toolbar, is used to move the image...
- 30
- 291
- 0


Tìm thêm:
- hệ việt nam nhật bản và sức hấp dẫn của tiếng nhật tại việt nam
- xác định các mục tiêu của chương trình
- xác định các nguyên tắc biên soạn
- khảo sát các chuẩn giảng dạy tiếng nhật từ góc độ lí thuyết và thực tiễn
- khảo sát chương trình đào tạo của các đơn vị đào tạo tại nhật bản
- khảo sát chương trình đào tạo gắn với các giáo trình cụ thể
- xác định thời lượng học về mặt lí thuyết và thực tế
- tiến hành xây dựng chương trình đào tạo dành cho đối tượng không chuyên ngữ tại việt nam
- điều tra đối với đối tượng giảng viên và đối tượng quản lí
- điều tra với đối tượng sinh viên học tiếng nhật không chuyên ngữ1
- khảo sát thực tế giảng dạy tiếng nhật không chuyên ngữ tại việt nam
- khảo sát các chương trình đào tạo theo những bộ giáo trình tiêu biểu
- nội dung cụ thể cho từng kĩ năng ở từng cấp độ
- xác định mức độ đáp ứng về văn hoá và chuyên môn trong ct
- phát huy những thành tựu công nghệ mới nhất được áp dụng vào công tác dạy và học ngoại ngữ
- mở máy động cơ lồng sóc
- mở máy động cơ rôto dây quấn
- các đặc tính của động cơ điện không đồng bộ
- hệ số công suất cosp fi p2
- đặc tuyến hiệu suất h fi p2